Showing posts with label Cooking with Kat. Show all posts

Tuesday, November 30, 2010

Saturday Breakfasts

Since Karlie moved into our house, we have been having breakfast with some close friends that live nearby every couple of Saturdays. It has been a lot of fun, and I have been able to do a little bit of experimental breakfast cooking.

You see, I'm not much of a breakfast person. Not that I'm anti-breakfast, it's just that, well, I value sleep a little more than waking up for that first meal. I know, I know, it's the most important meal of the day, and if you eat breakfast you are more apt to lose weight. Well, as you can read about here, it doesn't work for me, and I end up starving by 10:30 if I eat breakfast.

So, the only times I ever cook breakfast food are either when we eat breakfast for dinner (MAYBE once a year), or when I make something for Sunday School the night before. But now that we have been having Saturday breakfasts around 10:30, and there are more people than just me, it has been fun to experiment and look through all my cookbooks for yummy breakfast ideas.

I made something new this weekend from a cookbook called "Breakfast on the Battery" that my sweet mother-in-law got me from her last trip to New England. It's called Sausage Wellington. You can pretty much bet your life that anything with "Wellington" in the title is going to be a grand slam, so when I saw the recipe, there was no hesitation. I should have taken pics of the preparation, but all I have for you is the finished product.


Basically, it's sausage and cream cheese mixed with some diced mushrooms and onion, some sage, all put in a puff pastry and covered with hollandaise sauce. It. was. divinity. Definitely a repeater. So, I will try to get more with it for the next breakfasts and try to take pics and document the good ones.

If you have any "off the hook" breakfast recipes, send them my way!

~Kathryn

Thursday, July 1, 2010

Cooking with Kat: Potluck Potato, Ham, and Cheese Casserole. YUM!

This is one of my favorite meals to eat. You could definitely consider it comfort food. (-: It's a perfect meal for having people over, because pretty much everyone likes it, and it's pretty easy to make. I had two sweet girls come help with the cooking, so we had a fun time and everything was really yummy.

Here are the ingredients:
2-3 lbs potatoes, cubed
1 lb ham, cubed
1/4 cup onion
1/4 cup plus 1 Tbls butter
1 can cream of mushroom soup
8 oz sour cream
1 teas salt
2 cups cheddar cheese
2 cups stuffing

So. Here's whatcha do:

First, you cube the potatoes and then throw them in a pot to boil.


While the potatoes are boiling, you chop the onion and saute the onion wiht the salt and the butter until the onion is soft.

While that is cooking, you mix the can of soup with the sour cream. Karlie is rocking that here:


Once the onion and butter are done, you mix them in with the soup mixture.

Then, you drain the potatoes that are cooked but not falling apart and put the potatoes back in the pot and pour the soup mixture on top. You also add the cheese and the ham and stir. Here's Emily, stirring with her whole heart. (-:


And me, too:


After everything is mixed together (try not to destroy the potatoes), you pour the mixture into a casserole dish. And finally, you pour the stuffing on top and coat it with the final tablespoon of melted butter.

And then you look at the beautiful dishes:


And then you cook it in the oven at 350 degrees for around 45 minutes, or until bubbly. And then you serve it up and eat it:

Oh yeah, don't forget to poll the taste testers:


See? They all liked it. Because it is AWESOME. And you will like it, too. Seriously. You need to go and make it now and tell me how much you love it. (-:

HAPPY FRIDAY!

Oh, and Mark and I leave for our road trip on Sunday. We will be video blogging and regular blogging the experience. So, buckle up, it's going to be an exciting ride. (-:

~Kathryn

Saturday, May 8, 2010

Cooking with Kat: California Artichokes

At my weekly visit to Whole Foods yesterday, I was perusing the produce section only to stumble upon some beautiful artichokes. They were from California, were big, and were on sale. 2 for $3.00. I caved immediately.

So, along with all my other produce and groceries, I went home and unloaded the fridge, and the artichokes were just staring at me.

The problem was that I had never exactly made an artichoke before. I mean, sure I love me some artichoke spinach dip, but I had never cooked an artichoke.

So I did a little research online, pulled out my trusty "America's Test Kitchen" cookbook, and got to work. Ready to see my artichoke? I decided to cook the smaller of the two first, in case something went awry.


Pretty sweet, huh?

So, first things first. Apparently before you cook an artichoke, you are supposed to dip the artichoke in lemon water.


So, I cut a lemon in half, and squeezed all the juice out of the lemon into a large bowl of cold water.

Next, I cut the tip of the artichoke and the base off. The book says you are supposed to cut the thorny tips off all the fins things, but I didn't really see tips, so I didn't do that. Am I missing something?


To me, it looks like the tips were already removed. Oh well. You don't eat that part, anyway, so I just skipped that. But, I did cut off the base and the tip.


So, after this, I set the artichoke in the bowl of water.

Interesting, huh?

Okay, so, once that has been in bowl for a few minutes, it's time to get cookin'!

Artichokes are supposed to be steamed, so I pulled out my trusty steamer thing, put some water in the bottom part, and set the arty on top, and turned the burner on medium heat.


Lookin' good? So, I let the steamer do the rest of the work. I set the lid on top and steamed it for around 30 minutes. Once the leaf/fin/whatever things were really soft, I pulled the artichoke out and set it on a platter to cool.


Doesn't that look so good? So are you wondering how you eat it? You don't eat the outer couple of layers, but you pull off the individual pieces and use your teeth to scrape off the soft white part. We dipped the pieces in butter and ate them. And... it. was. divine. I am so glad we have another one. YUM!!!!

Let's see if Mark felt the same way:


And here's the remnants after we devoured the artichoke:


So, go to your local healthy grocery store, get ya one of these, and eat up! Bon Appetit!


~Kathryn

Wednesday, February 3, 2010

Cooking With Kat: The World's Best Sugar Cookie

I have been wanting to share this recipe for a really long time. I wanted to put it up at Christmas. But, when I made them at Christmas, a friend was over and I got too busy talking and only took like two or three pictures and it was really lame-o. So, with renewed focus and another friend, we made Valentine's Day (YAY!) sugar cookies. (Same cookie, different shapes).

These cookies are so easy to eat. It's like Pringles - once you pop, you can't stop. They are gone very quickly from our house. I always make light blue snowflakes with edible glitter for Christmas, for bridal showers I do engagement rings with glitter on the diamond part, I made some dog bone and poodle shaped ones for my vet, and for this particular batch, we made hearts. (awww).

So, here's whatcha need:


2.5 cups flour
2 tsp baking powder
1 stick butter, softened
1 cup sugar
2 large eggs
1 1/4 tsp vanilla

So, first we combined the two dry ingredients (no need for a pic, right)? And then we put all the other ingredients in the food processor, like so:


And then turned it on for a few seconds until it was all combined, like this:


Are you impressed? Well, watch this this next one. We put the dry ingredients in and put the food processor on for 30 seconds. Check out my friend Dayna (in a platonic way) as all she has to do is press the button.


Okay are you ready for this? After 30 seconds, this is what the dough looks like:


OMG, right? Yeah, SUPER easy. You should be amazed. If you aren't, scroll back up and look at the pics again.

So then you take out the dough and you put powdered sugar down on your surface to roll out the dough. You make sure both sides of the dough are covered well in powdered sugar and flip it over and keep covering and flattening it so you make sure the dough doesn't stick to the surface. Then you take the rolling pin and work from the middle to the outsides around the dough to roll it out.

They key is to get the dough really thin and even, so the cookies cook evenly. Then you use cookie cutters, like so:


You want the cookies to be loose so you can lift them of easily, so I usually try to move the cookie in the cutter to make sure it's good and loose.

Okay so the next picture on my camera is of Mark. While Dayna and I were partying in the kitchen, Mark was running at the free workout place at our apartment. Not that I need to, but I would like to point out his socks. Really? These apparently used to be red - he wore them in a wedding or something when he was a groomsman. Then he washed them and they turned pink. So why didn't he through them away? Apparently, "there's no reason to throw away a good pair of socks". Sigh.


Okay, back to what we were doing. Next, you put them on a buttered and powder sugared cookie sheet, and cook for 7-9 minutes at 375 degrees F.


There's Dayna, loading up the cookie sheets. Workin' hard. Once the cookies are done, we put them on a cooling rack. When they cooled, we started icing them.

For the icing, you use lots of powdered sugar and a TINY bit of milk, and then mix it together until it is the consistency you want. Add a little food coloring, and voila!


Aren't they so beautiful? Oh yeah, we put sprinkles on there. Here's another pic:


And they were easy to make and so beautiful! Yay! We took these to a fun bloggy party and I took them to work and the people ate a lot of them at work. My boss almost punked me and pretended to have eaten all but one cookie before I could take them to the party. I work with a bunch of comedians. (-:

And look how happy we are with our cookies:


Of course we had to put them by our taste tester. Here's what he thought:


So there you have it. An easy, WONDERFUL, and beautiful sugar cookie that is so versatile. Now go make some and enjoy!

~Kathryn

Thursday, January 14, 2010

Cooking with Kat: Chicken Spaghetti of Pioneer Woman Fame

It's about time I cooked on this blog! For Christmas I got the Pioneer Woman cookbook and I have already made two recipes from it. So far, they are great!

We had some dear friends of ours over for dinner, and I told Mark he could pick what we were having. I guess it might have been nice if I let my guests pick... oops. Maybe next time. (-: I gave Mark a few choices based on the meals I had planned for and had ingredients, and he picked chicken spaghetti.

I also know I shouldn't have tried a new recipe with guests, but I figured they would still be my friends if it didn't out well, and there's always Papa John's, right?

So, I got most of the ingredients all rounded up at my local Whole Foods. I have been trying to switch things over to organic when I can, and so for this recipe, several items were organic. So, here's the recipe:


  • 2 cups Cooked Chicken
  • 1 lb (3 cups) Dry Spaghetti, Broken Into Two Inch Pieces
  • 2 cans Cream Of Mushroom Soup
  • 2 cups Grated Sharp Cheddar Cheese
  • ¼ cups Finely Diced Green Pepper
  • ¼ cups Finely Diced Onion
  • 1 jar (4 Ounce) Diced Pimentos, Drained
  • 2 cups Reserved Chicken Broth From Pot
  • 1 teaspoon Lawry's Seasoned Salt
  • ⅛ teaspoons (to 1/4 Teaspoon) Cayenne Pepper
  • Salt And Pepper, to taste
  • 1 cup Additional Grated Sharp Cheddar Cheese


And the photo:


 So, to fill you in on the organic ingredients, I got organic cream of mushroom soup, veggies, 1/2 of the pasta was organic and the cheese is from cows that were not given antibiotics/hormones I think. I will say the soup was very different than regular Campbell's. It was more "soupy". You know how Campbells is kind of thick the gel like? This was darker in color and more liquidy. I thought that was interesting. 


So, to start of this recipe, I took a big fat short cut. Instead of cooking my own chicken, I bought a rotisserie chicken, because that's how I roll. And also because they taste SOOO good. AND bonus, I found them at Whole Foods, so next time I will get one from there. Here's my bird:


 While I snuck pieces of the chicken, I started boiling the water, and broke the pasta up into 2 inch pieces and tossed them into the pot. Then things got a little difficult.


I have a Pampered Chef cheese grater. Well, either I'm a terrible cheese grater, or I need to grow some muscles or something, because grating that cheese was wearing me out!


Yeah. That's what I looked like. Clearly not happy. So, I said FORGET IT! And I got out my handy food procesor with my cheese grater thing and all I had to do was throw the cheese in a press a button, and voila! OMG, if you don't have one of these, you've GOT to get one.


 See? Look how happy I am. And look at the beautifully grated cheese. Victory is mine.


I chopped up the veggies, and then I realized something. When I went grocery shopping I bought a lot of  ingredients for a lot of things. One of them was for olive cheese bread, and I mistook the Chicken-spaghetti pimientos for the olive cheese bread, and left it in Ft. Worth over New Year's. Oops. So, no pimientos in this spaghetti!


 Ha - look at that cheese. I think I must have the grater set too fine, so it made it more difficult. Anyway, so, once the pasta was done, I combined all the ingredients except 1/2 cup cheese.


Yay for the little kick that the cayenne pepper adds. (-: You can add the seasonings, and then taste, and add more if you need to.


So, then I poured it into a casserole dish, put the remaining cheese on top, and popped it into the oven at 350 degrees for 45 minutes, or until bubbly.


Looks pretty yummy huh? So, while that was cooking, I ran around like a crazy person picking up the apartment. (-:


And then the guests arrived and we started serving it:


We had some organic spring mix with parmesan with it and some sweet tea, because there's no other way to drink it, in my book. (-:


So, how was it? It was pretty darn good! Mark said it was good enough to do again. So I think we will. Maybe I'll add the pimientos next time, maybe not. I had several taste testers, so here's what they had to say:


They look pretty genuinely happy, but who can ever tell? (-:


Until next time, Bon Appetit! 


~Kathryn

Monday, December 7, 2009

Cooking With Kat: The Healthiest of Cookies

So sorry for the delay in posting, everyone! But don't you worry, I've got some good posts swimming around in my head that I will try to get into the computer in the near future. One of these such posts will talk about a new sort of leaf I am turning over, relating to being healthier. This post is a by-product of this new type of thinking.

A healthy cookie.

Like REALLY healthy.

And, it actually tastes good. I'm for real. Now, it's not like a sugar filled choc chip, but it's good, and good for you! (-:

I found this recipe in my new favorite magazine. And let me say, I had buyer's remorse on this magazine until it actually arrived. A magazine salesperson came to my apartment and I totally caved and bought a TWO YEAR subscription, and spent way too much money. BUT, after it arrived, I've decided it was totally worth it.

So, what magazine is it you ask? I'm so glad you did...


Natural Health. It. Is. Fabulous.

They even have Blue Buffalo advertising in it, and I LOVE Blue Buffalo! (www.bluebuff.com)

Anyway, I digress. So, I was looking through this wonderful magazine, and found some Christmas cookie recipes.


The one I decided to try is the oatmeal chocolate chip recipe. And apparently the photo is fuzzy so I don't think you could read it. Sigh. So, here are the ingredients:


1/2 cup unsweetened applesauce
1/2 cup organic evaporated cane juice crystals (easily found at Whole Foods)
1 egg
1 teas vanilla
1 Tbs honey
1 Tbs olive oil
1 cup whole wheat flour, sifted (I actually missed the whole sifting part)
1 1/2 cup rolled oats
1/2 ts baking powder
1/2 ts baking soda
1/2 ts salt
1 Tbs cinnamon
1/2 cup dark choc chips, semi-sweet

So, here's whatcha do!

Mix the applesauce and the cane juice crystals in your handy dandy mixer. Once those are mixed, add the egg, vanilla, honey, and olive oil and mix well.


Then, in a separate bowl, combine the flour, oats, baking powder and baking soda, salt, and cinnamon.


Mix those and then slowly combine with the wet ingredients and mix until combined.

Oh, here's what Mark was doing while I was making the cookies. The Texas/Nebraska game was on TV, and he was hooked. Here he is, making a goofy face.


Anyway, back to the kitchen. So, you mix the ingredients together and then mix in the chocolate chips. I used dark chocolate chips, I don't know if they were semi-sweet, but they are yummy!


Then, you take small spoons and put it on parchment paper on a baking sheet. I used the batch to get about 30 cookies. In the magazine, the cookies looked flat, so I think I needed to flatten the cookies before baking them. So, you might want to flatten them - I think I will next time.


Then you bake them at 350 for 12-15 minutes, until the edges are crisp.

You guys, these cookies are GOOD and GOOD FOR YOU!!!

If you make 30 cookies, each cookie will have 66 calories, 2 grams fat, 2 grams protein, and 2 grams fiber, and 12 grams carbs. WOO!!!!!

So, here's our taste tester:


He even liked them, too! They are filling, don't give you a sugar rush, and have things like cinnamon which are really healthy. WOO!!!!

What do you think?

~Kathryn

Monday, October 26, 2009

Cooking with Kat: Apple Pie with Dayna

***Tune in for the results of the pumpkin carving competition coming later this week! (-: ***

Okay, everyone! It's pie time! Fall is perfect for apple pie! You know the saying "easy as pie"? Well, it's really not hard, you just have to know how to do it. The apple pie we are making will have a very flaky crust and be filled with awesomeness. Make this and I PROMISE people will love it. It never fails - unless someone just doesn't know what good is! (-:

Also, the crust can be used for any type of pie, even chicken pot pie! (-: It's a staple recipe that is awesome.

So here's the recipe:

Filling:
8 apples cut into 1/2 inch lengths (4 granny smith, 4 red delicious)
1 cup sugar
3 Tbls flour
1/4 teas salt
1 teas cinnamon
1/4 cup butter

Crust:
2 cups sifted flour
1 cup crisco
1 tsp salt
6 Tbs ice water

Okay! First of all, here I am with my sweet friend Dayna, ready to make some pie!!!


So, first you work on your filling! The apples are obviously the focus of an apple pie, so it's important to get good ones. We used granny smith with red delicious in order to get a good mix of tartness with sweetness. You have to make sure your apples are the same size, or the tart/sweet with be stronger than the other.

So. You take your apples and peel and slice them. Dayna brought a handy dandy slicer/corer thing, so we used that, and then we peeled them by hand with knives. Here she is, in action:


This is about the size they should be, pre-peeled.


Next, you peel them until your finished apples look like this:


Next, you take your dry ingredients (sugar, flour, salt, and cinnamon) and mix them together in a bowl.


Then you pour those ingredients on top of the apples and mix it together - by hand is really best. Go, Dayna, go!!


Then you set that bowl aside - the filling is just about done! Easy as pie! (-:

Next comes the crust. Okay people. I know. I've heard all the excuses. I've failed more than once at making my own crust. But don't we ALL agree they taste INFINITELY better than storebought? And doesn't it just make your heart happy knowing that you made your own crust? So, if it doesn't work the first time, try again! Occasionally, I still have to throw out a pie crust because it just doesn't work. But I just start another one! Live and learn. You can DEFINITELY DO THIS.

Okay.... here we go!!! Get excited!!

First, you sift out your flour. This old flour sifter was my Nana's. Every time I went to her house she would have pies ready for us, and she would always have leftover pie crust dough in the refrigerator because she knew how much I loved it.


Then you mix in your salt. Next is where it starts to get a little tricky (DO NOT FREAK OUT!) You are going to take the crisco, and mix it in with the flour and salt. The best way to do this is with a dough separator, as you can see below. A fork also works, but your hands really don't at this point. You want to get the crisco mixed in enough to where it is a coarse mixture of flour/crisco.


Once you have the flour and crisco mixed until coarse (the crisco pieces will be pea sized or smaller), you start mixing in your ice water. This part is where you really have to be on your toes. The water has to be ICE water, because once your dough is formed, you want it to maintain its shape so you can roll it out. As the crisco sets at room temperature, the dough will not be able to be worked with, so you have to work quickly. Mix the water in one Tbs at a time, until all six are in there, then comes the fun part. Use your hands to work the dough to where it is a firm ball. Don't knead it too much or the dough will become leathery and won't work. Work with it just enough to get it to a ball.

Here's Dayna, using her hands! Oh, take off your rings unless you want them covered in Crisco! (-:


Here's the ball of dough:


See all that flour? Yeah, that's how much you need when you start rolling the dough. And more. Cut the ball of dough in half, and put half in the fridge. What you see above is half of the dough. Okay now, remember, we are still working quickly. Put the dough down, and push it down, flip it, make sure both sides are covered in flour, and press again. Flip and cover with flour, and you are ready to roll... ha ha.... get it? ready to roll... anyway... so basically the concept here is that you have to keep a good amount of flour so the dough will not stick to A. the rolling pin or B. the countertop. Also, if you start using the rolling pin immediately, what will likely happen is the dough will crack all around the edges and you will be hard pressed to get one nice round piece of dough.

Now we start to roll the dough. Work from the middle out, and work clockwise (or counterclockwise - it really doesn't matter) around the dough, so that each side is getting equally thinner and rolled out. If you aren't sure how large to make it, take a pie plate and hold it over the rolled out dough to see if it will be enough to cover it.


Once the dough is rolled out, you are going to fold it in half, twice, so it looks like this:


Okay, oops, we already put it in the pie plate. Basically, once it's folded into quarters you can lift it much easier and put it in the pie plate, and then you can unfold it so it covers the entire plate. Then you can work with it to cut off excess or patch places that didn't quite get enough dough.

Next, you pour the apples into the crust, and take that 1/4 cup of butter and cut it up and dot the top of the apples with butter! Lookin' good, already!


Almost done, you guys! Hungry yet? (-:

Then you get out the other half of the dough and roll out your second pie crust, fold it into quarters, and lay it on top of the apple filling, and unfold.


Then you work around the crust, fixing it, so it looks all pretty! (-:

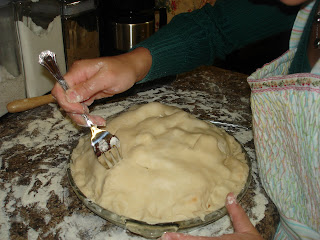
Then, use your fork to cut holes in the top of the pie so it is vented while cooking. You can use a knife, as well, and I usually cut some sort of shape in the middle, like a heart. yay!


Next, mix some sugar and cinnamon together and sprinkle on top so it looks awesome!


Doesn't that look good? Okay, now you bake that pie for one hour at 350 degrees.....

Then you take the pie out and slice it and put ice cream on it and OH.MY.GOODNESS.


And here's our taste tester:


Okay, now, everyone, ready, set, and go bake a pie! I promise you will love it! (-:

~Kathryn


Blog Design by Sweet Simplicity