Okay, everyone! It's pie time! Fall is perfect for apple pie! You know the saying "easy as pie"? Well, it's really not hard, you just have to know how to do it. The apple pie we are making will have a very flaky crust and be filled with awesomeness. Make this and I PROMISE people will love it. It never fails - unless someone just doesn't know what good is! (-:
Also, the crust can be used for any type of pie, even chicken pot pie! (-: It's a staple recipe that is awesome.
So here's the recipe:
Filling:
8 apples cut into 1/2 inch lengths (4 granny smith, 4 red delicious)
1 cup sugar
3 Tbls flour
1/4 teas salt
1 teas cinnamon
1/4 cup butter
Crust:
2 cups sifted flour
1 cup crisco
1 tsp salt
6 Tbs ice water
Okay! First of all, here I am with my sweet friend Dayna, ready to make some pie!!!
So, first you work on your filling! The apples are obviously the focus of an apple pie, so it's important to get good ones. We used granny smith with red delicious in order to get a good mix of tartness with sweetness. You have to make sure your apples are the same size, or the tart/sweet with be stronger than the other.
So. You take your apples and peel and slice them. Dayna brought a handy dandy slicer/corer thing, so we used that, and then we peeled them by hand with knives. Here she is, in action:

This is about the size they should be, pre-peeled.

Next, you peel them until your finished apples look like this:

Next, you take your dry ingredients (sugar, flour, salt, and cinnamon) and mix them together in a bowl.

Then you pour those ingredients on top of the apples and mix it together - by hand is really best. Go, Dayna, go!!

Then you set that bowl aside - the filling is just about done! Easy as pie! (-:
Next comes the crust. Okay people. I know. I've heard all the excuses. I've failed more than once at making my own crust. But don't we ALL agree they taste INFINITELY better than storebought? And doesn't it just make your heart happy knowing that you made your own crust? So, if it doesn't work the first time, try again! Occasionally, I still have to throw out a pie crust because it just doesn't work. But I just start another one! Live and learn. You can DEFINITELY DO THIS.
Okay.... here we go!!! Get excited!!
First, you sift out your flour. This old flour sifter was my Nana's. Every time I went to her house she would have pies ready for us, and she would always have leftover pie crust dough in the refrigerator because she knew how much I loved it.

Then you mix in your salt. Next is where it starts to get a little tricky (DO NOT FREAK OUT!) You are going to take the crisco, and mix it in with the flour and salt. The best way to do this is with a dough separator, as you can see below. A fork also works, but your hands really don't at this point. You want to get the crisco mixed in enough to where it is a coarse mixture of flour/crisco.

Once you have the flour and crisco mixed until coarse (the crisco pieces will be pea sized or smaller), you start mixing in your ice water. This part is where you really have to be on your toes. The water has to be ICE water, because once your dough is formed, you want it to maintain its shape so you can roll it out. As the crisco sets at room temperature, the dough will not be able to be worked with, so you have to work quickly. Mix the water in one Tbs at a time, until all six are in there, then comes the fun part. Use your hands to work the dough to where it is a firm ball. Don't knead it too much or the dough will become leathery and won't work. Work with it just enough to get it to a ball.
Here's Dayna, using her hands! Oh, take off your rings unless you want them covered in Crisco! (-:

Here's the ball of dough:

See all that flour? Yeah, that's how much you need when you start rolling the dough. And more. Cut the ball of dough in half, and put half in the fridge. What you see above is half of the dough. Okay now, remember, we are still working quickly. Put the dough down, and push it down, flip it, make sure both sides are covered in flour, and press again. Flip and cover with flour, and you are ready to roll... ha ha.... get it? ready to roll... anyway... so basically the concept here is that you have to keep a good amount of flour so the dough will not stick to A. the rolling pin or B. the countertop. Also, if you start using the rolling pin immediately, what will likely happen is the dough will crack all around the edges and you will be hard pressed to get one nice round piece of dough.
Now we start to roll the dough. Work from the middle out, and work clockwise (or counterclockwise - it really doesn't matter) around the dough, so that each side is getting equally thinner and rolled out. If you aren't sure how large to make it, take a pie plate and hold it over the rolled out dough to see if it will be enough to cover it.

Once the dough is rolled out, you are going to fold it in half, twice, so it looks like this:

Okay, oops, we already put it in the pie plate. Basically, once it's folded into quarters you can lift it much easier and put it in the pie plate, and then you can unfold it so it covers the entire plate. Then you can work with it to cut off excess or patch places that didn't quite get enough dough.
Next, you pour the apples into the crust, and take that 1/4 cup of butter and cut it up and dot the top of the apples with butter! Lookin' good, already!

Almost done, you guys! Hungry yet? (-:
Then you get out the other half of the dough and roll out your second pie crust, fold it into quarters, and lay it on top of the apple filling, and unfold.

Then you work around the crust, fixing it, so it looks all pretty! (-:
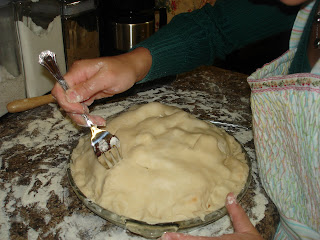
Then, use your fork to cut holes in the top of the pie so it is vented while cooking. You can use a knife, as well, and I usually cut some sort of shape in the middle, like a heart. yay!

Next, mix some sugar and cinnamon together and sprinkle on top so it looks awesome!

Doesn't that look good? Okay, now you bake that pie for one hour at 350 degrees.....
Then you take the pie out and slice it and put ice cream on it and OH.MY.GOODNESS.

And here's our taste tester:

Okay, now, everyone, ready, set, and go bake a pie! I promise you will love it! (-:
~Kathryn


YUM! That looks fantastic! I will definitely be writing down your recipes :) Thanks for sharing.
ReplyDeleteThis looks delicious!! My candied yams were not such a big hit last year! I think I will try this =D Thanks for the detailed recipe =D
ReplyDelete"Someone's in the kitchen with Dayna. Someones in the Kitchen I know!Someones in the kitchen with Dayna strumming on the ol' banjo" ...is what I thought of when I read this! lol
ReplyDeleteWOW! That sounds and looks fantastic. I haven't mastered the whole baking of pies yet. I'm still trying to bake great cookies and cake from a box. Haha. Stopping by from SITS and love your blog!
ReplyDeleteKathryn! Hi! I LOVE your blog (food/cooking blogs are some of my favorite things in the world...) :)
ReplyDeleteThanks so much for the Mayo tip (I'll spare your readers before going into more detail..haha) I REALLY need to try that. Talk to you soon!
Great looking pie!!!
ReplyDeletelove all the pics... especially the happy smile with the thumbs up from your tester :)
ReplyDeleteI love apple pie!! I made my first one from scratch this year also!!
ReplyDeleteI love the tip about folding the crust! That is something I will be using in the future for sure! :)
I make a crumb topping on mine, and it's so yummy! It's from the Betty Crocker website, or I think I might have it posted on my blog if you are interested!
-Melissa